Editing Tutorials: Difference between revisions
→Inserting images into a page: added instructions for inserting images |
Text replacement - "/wiki/index.php" to "/w/index.php" |
||
| (21 intermediate revisions by 2 users not shown) | |||
| Line 1: | Line 1: | ||
NanoFab users are highly encouraged to contribute their own work, characterizations and corrections to our Wiki! Read on to learn how to do this. |
|||
== Basic Editing == |
|||
__TOC__ |
__TOC__ |
||
==Basic Editing== |
|||
===Editing an Existing Page=== |
===Editing an Existing Page=== |
||
The First step is to log in: |
The First step is to log in: |
||
[[File:Wiki- Log In - Screen Shot 2017-11-30 at 4.14.49 PM.png|border]] |
[[File:Wiki- Log In - Screen Shot 2017-11-30 at 4.14.49 PM.png|border]] |
||
All active NanoFab users can make a login - see [[Frequently Asked Questions#How do I get a login to the wiki.3F|this FAQ]] for how to do that. |
|||
Then navigate to the page you want to edit. |
Then navigate to the page you want to edit. |
||
Once you are at the page, click on "'''''Edit'''''" to launch the [https://www.mediawiki.org/wiki/Help:VisualEditor/User_guide Visual Editor]. "''Edit Source''", allows you to edit the [https://en.wikipedia.org/wiki/Help:Cheatsheet wikimarkup] source code directly, which is much less intuitive and not recommended. |
Once you are at the page, click on "'''''Edit'''''" to launch the [https://www.mediawiki.org/wiki/Help:VisualEditor/User_guide Visual Editor]. "''Edit Source''", allows you to edit the [https://en.wikipedia.org/wiki/Help:Cheatsheet wikimarkup] source code directly, which is much less intuitive and '''not recommended'''. |
||
[[image:Basic1.png|thumb|none|600px|Click Edit.]] |
[[image:Basic1.png|thumb|none|600px|Click Edit.]] |
||
After clicking ''[Edit]'', you will be able to type directly into the page to make your changes. |
After clicking ''[Edit]'', you will be able to type directly into the page to make your changes. |
||
| Line 19: | Line 25: | ||
'''Show changes''': This will give you a before and after comparison of the page.<br> |
'''Show changes''': This will give you a before and after comparison of the page.<br> |
||
'''Cancel''': This will cancel any changes.<br> |
'''Cancel''': This will cancel any changes.<br> |
||
'''Rich Editor''': For [Edit Source] mode, this will open the rich text editor (which is explained below).<br> |
|||
* |
*The Visual Editor opened by hitting ''[Edit]'' is pretty self-explanatory for most purposes. See the [https://www.mediawiki.org/wiki/Help:VisualEditor/User_guide Visual Editor User Guide] for more info on using the editor. The "[https://www.mediawiki.org/wiki/Help:VisualEditor/User_guide#Editing_tables Editing Tables]" section is useful for our etch/deposition tables. |
||
* |
*Please use '''Show Preview''' to make sure your edits look as expected. |
||
* |
*Be sure to enter a brief ''description of what you changed'', so Editors can approve you changes quickly. |
||
Using the Visual Editor on a text page: |
|||
The two editing methods: |
|||
Using the Visual Editor on a text page, via the '''[Edit]''' tab (recommended): |
|||
[[File:VisualEditor In Action v1.gif|alt=Visual Editor in action, animated|none|thumb|650x650px]] |
[[File:VisualEditor In Action v1.gif|alt=Visual Editor in action, animated|none|thumb|650x650px]] |
||
The ''[Edit Source]'' mode, showing wikimarkup source code for the page. ''[Rich Editor]'' provides some code shortcuts: |
(<u>Not recommended</u>) The '''''[Edit Source]''''' mode, showing wikimarkup source code for the page. ''[Rich Editor]'' provides some code shortcuts: |
||
[[image:Basic2.png|thumb|none|650x650px]] |
[[image:Basic2.png|thumb|none|650x650px]] |
||
We do have some old antiquated "coded" parts of the site, which are holdovers from before we installed the modern "Visual Editor". Due to existing page linking/URLs, many of these can't be changed (such as code used for superscripts and subscripts in page names). |
We do have some old antiquated "coded" parts of the site, which are holdovers from before we installed the modern "Visual Editor". Due to existing page linking/URLs, many of these can't be changed (such as code used for superscripts and subscripts in page names). |
||
=== |
===Making a New Page=== |
||
Only Staff & Admins can make new pages. If you want to do this but don’t have permission, please let the [[Wiki Admin|wiki admin]] know and we’ll be happy to help you complete your edits. |
|||
The preferred way to make a new page is to first create a Link to a page that doesn't exist (within an existing page), and then follow that Link to create the new page. Do this as follows: |
The preferred way to make a new page is to first create a Link to a page that doesn't exist (within an existing page), and then follow that Link to create the new page. Do this as follows: |
||
# On the existing page, [Edit] the page, and type the text you would like to become a hyperlink. |
|||
# Select the desired text, and click the Hyperlink button [[File:Editing Toolbar Hyperlink Button 01.png|24x24px]] which pops up the link panel. |
|||
# Type the '''''desired name of the new page''''' into the "search" field - it will show a red link in the search field, indicating that the page doesn't exist yet. [[File:Editing Tutorial - Hyperlink panel nonexisting page 01.png|alt=Screenshot of hyperlink panel, Creating a hyperlink to a nonexisting page.|none|thumb|Creating a hyperlink to a nonexisting page.]] |
|||
# Click the Red Link in the menu, which then sets this as the target of your Hyperlink.[[File:Editing Tutorial - Hyperlink panel nonexisting page 02 - CLICK arrow.png.png|alt=Screenshot showing Hyperlink panel to nonexisting page - Showing Arrow to CLICK on RedLink|none|thumb|Click on the RedLink in the search results.]] |
|||
# Save the changes you have made to this page. |
|||
# After Saving the page, you will see a "Red Link" - '''''colored red because it leads to a nonexistent page.''''' [[File:RedLink Screenshot.png|none|thumb|189x189px|A "red link", linking to a nonexistent page.]] |
|||
# Click the red-link to the nonexistent page, which will show an option to create the new page. |
|||
# Click [Create] to make the new page in VisualEditor mode (defaults to Source mode, which is not recommended). [[File:Click on "Create" Tab to enter VisualEditing Mode.png|alt=Screenshot showing to Click on "Create" Tab to enter VisualEditing Mode|none|thumb|506x506px|Click on the "Create" Tab to enter VisualEditing Mode]] |
|||
# Make sure to "Save" the new page! |
|||
#On the existing page, [Edit] the page, and type the text you would like to become a hyperlink. |
|||
=== Inserting images into a page === |
|||
#Select the desired text, and click the Hyperlink button [[File:Editing Toolbar Hyperlink Button 01.png|24x24px]] which pops up the link panel. |
|||
#Type the '''''desired name of the new page''''' into the "search" field - it will show a red link in the search field, indicating that the page doesn't exist yet. [[File:Editing Tutorial - Hyperlink panel nonexisting page 01.png|alt=Screenshot of hyperlink panel, Creating a hyperlink to a nonexisting page.|none|thumb|Creating a hyperlink to a nonexisting page.]] |
|||
#Click the Red Link in the menu, which then sets this as the target of your Hyperlink.[[File:Editing Tutorial - Hyperlink panel nonexisting page 02 - CLICK arrow.png.png|alt=Screenshot showing Hyperlink panel to nonexisting page - Showing Arrow to CLICK on RedLink|none|thumb|Click on the RedLink in the search results.]] |
|||
#Save the changes you have made to this page. |
|||
#After Saving the page, you will see a "Red Link" - '''''colored red because it leads to a nonexistent page.''''' [[File:RedLink Screenshot.png|none|thumb|189x189px|A "red link", linking to a nonexistent page.]] |
|||
#Click the red-link to the nonexistent page, which will show an option to create the new page. |
|||
#Click [Create] to make the new page in VisualEditor mode (defaults to Source mode, which is not recommended). [[File:Click on "Create" Tab to enter VisualEditing Mode.png|alt=Screenshot showing to Click on "Create" Tab to enter VisualEditing Mode|none|thumb|506x506px|Click on the "Create" Tab to enter VisualEditing Mode]] |
|||
#Make sure to "Save" the new page! |
|||
===Inserting images into a page=== |
|||
Only Staff & Admins May upload files. If you want to do this but don’t have permission, please let the [[Wiki Admin|wiki admin]] know and we’ll be happy to help you complete your edits. |
|||
There are numerous ways to insert an image into a page you are editing. Here we describe one method only that is the easiest to follow. |
There are numerous ways to insert an image into a page you are editing. Here we describe one method only that is the easiest to follow. |
||
In addition, there are various options that allow you to insert the image inline |
In addition, there are various options that allow you to insert the image inline with text, or on it's own line with a caption+border, or off to the side with text flowing around it. These are each described at the bottom. |
||
# You should be in VisualEditor mode on the page, not source mode. Click the |Create| tab to enter VisualEditor mode. |
|||
#You should be in VisualEditor mode on the page, not source mode. Click the '''|Create|''' tab to enter VisualEditor mode. |
|||
# Place your text cursor in the location you would like to insert the image. |
|||
# |
#Place your text cursor in the location you would like to insert the image. |
||
#In the VisualEditor toolbar, click '''''Insert > Media'''''. You can insert your image in two ways |
|||
## If the image is already uploaded to the server, use the "''<u>Search</u>''" tba to find it and select it. |
|||
##If the image is already uploaded to the server, use the "''<u>Search</u>''" tab to find it and select it. |
|||
## If you would like to upload a new image from your computer, switch to the "''<u>Upload</u>''" tab > (Choose File) to select the file on your computer, and upload it. Please give it a filename that begins with the purpose of the image, eg. "''LEXT Instructions - Cancel button.jpg''" or "''E-Beam1 Tool Photograph.png''". This makes it easy to search for your image, and know what it is used for (and it won't get accidentally deleted this way!). |
|||
##If you would like to upload a new image from your computer, switch to the "''<u>Upload</u>''" tab > (Choose File) to select the file on your computer, and upload it. Please give it a filename that begins with the purpose of the image, eg. "''LEXT Instructions - Cancel button.jpg''" or "''E-Beam1 Tool Photograph.png''". This makes it easy to search for your image, and know what it is used for (and it won't get accidentally deleted this way!). |
|||
# Click "'''''Use This Image'''''". The Image's "'''Media Settings'''" window will automatically pop up. The "'''General Settings'''" fields are optional. |
|||
#Click "'''''Use This Image'''''". The Image's "'''Media Settings'''" window will automatically pop up. The "'''General Settings'''" fields are optional. |
|||
# Switch to the "'''Advanced Settings'''" panel |
|||
#Switch to the "'''Advanced Settings'''" panel |
|||
##[[File:MacOS - Happy Mac.png|alt=floating happy mac image|thumb|"Floating" Image example]]If you want to have the image "float" to any convenient place on the page, leave '''[√] Wrap text around this item''' enabled. |
|||
##If you want to have the image "float" to any convenient place on the page, leave '''[√] Wrap text around this item''' enabled. See the "Floating image" example to the right → [[File:MacOS - Happy Mac.png|alt=floating happy mac image|thumb|"Floating" Image example]] |
|||
###To include a caption, use the '''Thumbnail''' image type, and set the caption in the '''General Settings''' pane. |
|||
##If you want the image to show up in-line with your text, like this: [[File:MacOS - Happy Mac.png|frameless|20x20px]] |
##If you want the image to show up in-line with your text, like this: [[File:MacOS - Happy Mac.png|frameless|20x20px]] |
||
### |
###Uncheck '''[√] ''Wrap text around this item''''' |
||
### |
###Choose "frameless" or "basic" image type |
||
## |
##Optionally click '''''Image Size > Custom''''' and reduce ''only'' ''one'' of the sizes until the image size looks good. |
||
### |
###Image Widths (1st field) of about 200-600px look good as stand-alone images, floating on the page. |
||
### |
###Image Heights (2nd field) of about 10-40px look good inline next to text. |
||
# |
#Click '''''Insert''''' to insert the image. You can always Double-Click the image or Choose the '''''Edit''''' button to change these settings again. |
||
===Linking to a PDF or other file=== |
|||
First you upload the PDF (or other acceptable file type), and copy the link to the newly uploaded PDF, and then paste that link into your Wiki page. It is useful to do this with two separate windows open, one for editing the wiki page you want to add a link on, and another for uploading the file. |
|||
#Make sure you are logged in. If you get logged out during this process, don't close any windows, [https://wiki.nanotech.ucsb.edu/w/index.php?title=Frequently_Asked_Questions#.22Something_went_wrong.22_while_saving_my_edits.21_How_do_I_keep_my_edits.3F instead follow this]. |
|||
#Optionally, '''''open a new web-browser window''''' for performing the file upload. |
|||
#In the left sidebar, near the bottom, click '''Upload FIle''' |
|||
#:[[File:Editing Tutorials - Upload PDF - 1- upload file.png|border]] |
|||
#Click '''[Choose File]''' and select the file from your computer you want to upload. |
|||
#:[[File:Editing Tutorials - Upload PDF - 2- choose file.png|238x238px|border]] |
|||
#'''Enter the filename''' you'd like the file to have once it is on the server. Something simple like "ToolName - SOP.pdf" etc. Make sure you keep the same file extension. Also Enter a '''Description''' of the file, can be as simple as the above. This makes it searchable on the wiki. |
|||
#:[[File:Editing Tutorials - Upload PDF - 3b- filename descript upload button.png|300x300px|border]] <br /> |
|||
#Click the '''[Upload]''' button, and wait for the upload to complete (after which a new page will show). |
|||
##If it shows a warning, choose '''[Submit modified filename/description]''' |
|||
#::[[File:Editing Tutorials 3c- modifications etc..png|500x500px|border]] |
|||
#On the resulting ''File Info'' page, right-click the file link and '''Copy Link/URL'''. |
|||
#:[[File:Editing Tutorials 4b- file info right click URL.png|381x381px|border]] |
|||
#Back on the wiki page you're editing, select the text you want to link, and paste in the URL as an ''External Link''. |
|||
#:[[File:Editing Tutorials - 5- insert link into page.png|400x400px|border]] |
|||
==== Linking to a file you already uploaded ==== |
|||
If you already uploaded the file and now need to link to it, you can find the uploaded file and copy the link as follows: |
|||
# On the left sidebar, at the bottom section "'''Tools'''", click "'''Upload File'''". |
|||
# On that page, click the link for "'''List of Uploaded Files'''" in the 2nd sentence. |
|||
# Locate your file in the list. |
|||
# Click the Title of the file, which brings you to the File's ''File Info'' page - same as the above procedure (Step 7). |
|||
#: [[File:Editing Tutorials - List of Uploaded Files - click the file title to get file page.png|625x625px]] |
|||
# From here, follow Step 7 above onwards - you can now copy the directly link to the file itself, and insert into your desired Wiki page, as described above. |
|||
=== Updating an uploaded file to a new version === |
|||
You can replace an uploaded file with a new version. This means any links will now point to the new version. |
|||
* Find the "File:" page for the existing file on the wiki. Do this by: |
|||
** Searching the Wiki for the ''file name'' of the original file, or part of the file name. '''Hit [Enter] in the search bar''' to show all search results. |
|||
** In the search results, click on the Wiki-Page of your File - it will begin with "'''File:'''", such as "File: My Photo.jpg" |
|||
** Under "File History", click "'''upload new version'''". |
|||
** Upload your new version of the file. It will automatically have exact same destination file name on the server, so all links to the file will still work. |
|||
** (It can take ~1 day for user's web browsers to stop using cached old versions of the file.) |
|||
== |
==Administration== |
||
===Approving Edits (Staff/Admin only)=== |
===Approving Edits (Staff/Admin only)=== |
||
| Line 96: | Line 149: | ||
In your preferences you will find a lot of options. The 2 that you need to take care of are your e-mail address (enter it into the box labeled "E-mail") and you need to check the box next to "E-mail me when a page on my watch-list is changed." Save the changed by clicking "Save" at the bottom of the page. |
In your preferences you will find a lot of options. The 2 that you need to take care of are your e-mail address (enter it into the box labeled "E-mail") and you need to check the box next to "E-mail me when a page on my watch-list is changed." Save the changed by clicking "Save" at the bottom of the page. |
||
=== |
===Editing Restrictions=== |
||
To prevent unauthorized editing on the site, we have setup 4 different user groups. These restrictions only pertain to EDITING. |
To prevent unauthorized editing on the site, we have setup 4 different user groups. These restrictions only pertain to EDITING. |
||
1) '''Annonymous/Unregistered users''' |
1) '''Annonymous/Unregistered users''' |
||
:Anyone not registered or not logged in will not be able to edit anything on the site. |
:Anyone not registered or not logged in will not be able to edit anything on the site. |
||
2) '''Lab Users''' |
2) '''Lab Users''' |
||
:This is anyone who we know to be doing research in the lab (names taken from SignupMonkey). They are allowed to edit existing pages but are not allowed to upload files or create new pages. All edits by ''Lab Users'' have to be approved by staff members before they are viewable on the site. |
:This is anyone who we know to be doing research in the lab (names taken from SignupMonkey). They are allowed to edit existing pages but are not allowed to upload files or create new pages. All edits by ''Lab Users'' have to be approved by staff members before they are viewable on the site. |
||
3) '''Staff''' |
3) '''Staff''' |
||
:This group consist of all staff members. Staff will be able to edit 95% of the pages on the wiki. There are a select few pages on the site that are locked. For example, on the [[Main Page]], ''Staff'' do not have the option to "EDIT" the page, only the option to "VIEW SOURCE" |
:This group consist of all staff members. Staff will be able to edit 95% of the pages on the wiki. There are a select few pages on the site that are locked. For example, on the [[Main Page]], ''Staff'' do not have the option to "EDIT" the page, only the option to "VIEW SOURCE" |
||
4) '''Administrators''' |
4) '''Administrators''' |
||
:This group is for the people in charge of maintaining the nitty-gritty of the site. They have unrestricted access and can change anything on the site. They can also change the "user group level" for any user. |
:This group is for the people in charge of maintaining the nitty-gritty of the site. They have unrestricted access and can change anything on the site. They can also change the "user group level" for any user. |
||
==Troubleshooting / FAQ== |
|||
===It won't let me "Save" my changes!=== |
|||
Sometimes the web server logs you out due to "inactivity" when you are actually just spending a long time editing a page. Thus, when you try to "'''''save page'''''", you get an error like "you are not authorized to edit this page" since it thinks you're not logged in. |
|||
This is the typical error: |
|||
We could not save your edit because the session was no longer valid. Do you want to save this page as an anonymous user instead? Your IP address will be recorded in this page's edit history. |
|||
If this happens, do Not close the window with your unsaved edits! |
|||
A quick workaround is to open a New web-browser window, navigate to the [[Main Page|wiki]] and [[Special:UserLogin|log in there]]. After a few seconds, try saving the edited page again, and it should work this time. You may have to hit "'''''Try Again'''''" for it to work. |
|||
If this does not work, you want to be sure you don't lose all your hard work! One way to do this is to copy the Wiki Code into a text file on your computer, as follows: If you are using the VisualEditor (default), switch to Source Code view via the '''''Pen button''''' [[File:Visual Editor - switch to source mode - pen button.png|border|38x38px]] > '''''[Source Editing]''''', then '''''Select All''''' and '''''Copy''''' the code for the page. Then paste it into a NotePad.exe or TextEdit.app window on your computer (optionally save the file to your computer somewhere). |
|||
Then, once you have managed to log back into the Wiki, you can edit the ''''''Source'''''<nowiki/>' of the page and '''''paste''''' your source code in the appropriate place. Be sure to "Preview" the results to make sure it worked as expected, and that you pasted into the right spot! |
|||
===I can't upload my file - it says the file is too large=== |
|||
For uploaded files, there is a maximum file size limit and a limited list of allowed file types, to prevent hacking and viruses. If you run into one of these limitations please contact the [[Wiki Admin]] and they can help you get the file uploaded and properly linked. |
|||
Latest revision as of 19:52, 4 September 2021
NanoFab users are highly encouraged to contribute their own work, characterizations and corrections to our Wiki! Read on to learn how to do this.
Basic Editing
Editing an Existing Page
The First step is to log in:
All active NanoFab users can make a login - see this FAQ for how to do that.
Then navigate to the page you want to edit.
Once you are at the page, click on "Edit" to launch the Visual Editor. "Edit Source", allows you to edit the wikimarkup source code directly, which is much less intuitive and not recommended.

After clicking [Edit], you will be able to type directly into the page to make your changes.
There are a couple of key things to note on this page.
Press the [< Back] button on your web browser to cancel/discard any changes you made.
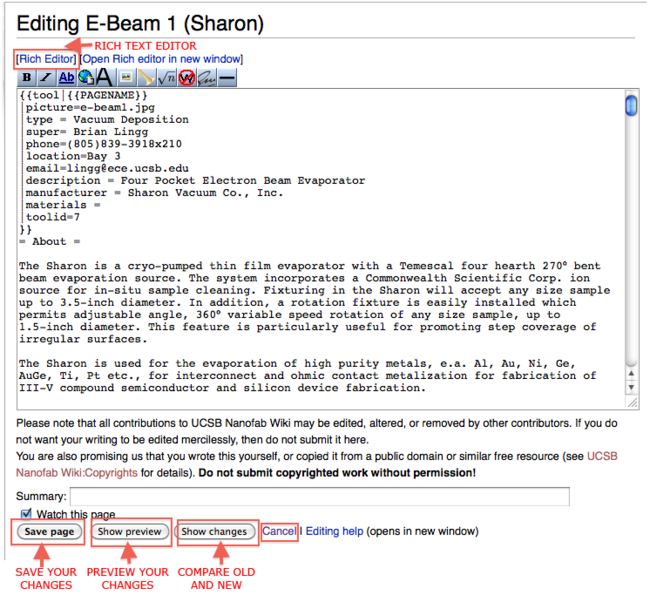
Save page: Clicking this will save any and all changes you have made.
Show preview: This will show you a preview of what the page will look like after you save it.
Show changes: This will give you a before and after comparison of the page.
Cancel: This will cancel any changes.
- The Visual Editor opened by hitting [Edit] is pretty self-explanatory for most purposes. See the Visual Editor User Guide for more info on using the editor. The "Editing Tables" section is useful for our etch/deposition tables.
- Please use Show Preview to make sure your edits look as expected.
- Be sure to enter a brief description of what you changed, so Editors can approve you changes quickly.
The two editing methods:
Using the Visual Editor on a text page, via the [Edit] tab (recommended):
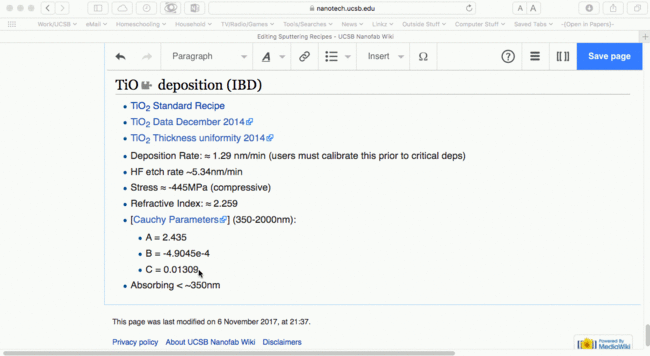
(Not recommended) The [Edit Source] mode, showing wikimarkup source code for the page. [Rich Editor] provides some code shortcuts:
We do have some old antiquated "coded" parts of the site, which are holdovers from before we installed the modern "Visual Editor". Due to existing page linking/URLs, many of these can't be changed (such as code used for superscripts and subscripts in page names).
Making a New Page
Only Staff & Admins can make new pages. If you want to do this but don’t have permission, please let the wiki admin know and we’ll be happy to help you complete your edits.
The preferred way to make a new page is to first create a Link to a page that doesn't exist (within an existing page), and then follow that Link to create the new page. Do this as follows:
- On the existing page, [Edit] the page, and type the text you would like to become a hyperlink.
- Select the desired text, and click the Hyperlink button
 which pops up the link panel.
 - Type the desired name of the new page into the "search" field - it will show a red link in the search field, indicating that the page doesn't exist yet.
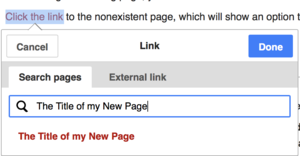
Creating a hyperlink to a nonexisting page. - Click the Red Link in the menu, which then sets this as the target of your Hyperlink.
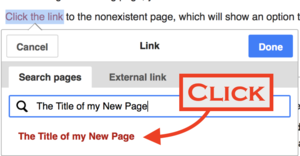
Click on the RedLink in the search results. - Save the changes you have made to this page.
- After Saving the page, you will see a "Red Link" - colored red because it leads to a nonexistent page.

A "red link", linking to a nonexistent page. - Click the red-link to the nonexistent page, which will show an option to create the new page.
- Click [Create] to make the new page in VisualEditor mode (defaults to Source mode, which is not recommended).

Click on the "Create" Tab to enter VisualEditing Mode - Make sure to "Save" the new page!
Inserting images into a page
Only Staff & Admins May upload files. If you want to do this but don’t have permission, please let the wiki admin know and we’ll be happy to help you complete your edits.
There are numerous ways to insert an image into a page you are editing. Here we describe one method only that is the easiest to follow.
In addition, there are various options that allow you to insert the image inline with text, or on it's own line with a caption+border, or off to the side with text flowing around it. These are each described at the bottom.
- You should be in VisualEditor mode on the page, not source mode. Click the |Create| tab to enter VisualEditor mode.
- Place your text cursor in the location you would like to insert the image.
- In the VisualEditor toolbar, click Insert > Media. You can insert your image in two ways
- If the image is already uploaded to the server, use the "Search" tab to find it and select it.
- If you would like to upload a new image from your computer, switch to the "Upload" tab > (Choose File) to select the file on your computer, and upload it. Please give it a filename that begins with the purpose of the image, eg. "LEXT Instructions - Cancel button.jpg" or "E-Beam1 Tool Photograph.png". This makes it easy to search for your image, and know what it is used for (and it won't get accidentally deleted this way!).
- Click "Use This Image". The Image's "Media Settings" window will automatically pop up. The "General Settings" fields are optional.
- Switch to the "Advanced Settings" panel
- If you want to have the image "float" to any convenient place on the page, leave [√] Wrap text around this item enabled. See the "Floating image" example to the right →

"Floating" Image example - To include a caption, use the Thumbnail image type, and set the caption in the General Settings pane.
- If you want the image to show up in-line with your text, like this:

- Uncheck [√] Wrap text around this item
- Choose "frameless" or "basic" image type
- Optionally click Image Size > Custom and reduce only one of the sizes until the image size looks good.
- Image Widths (1st field) of about 200-600px look good as stand-alone images, floating on the page.
- Image Heights (2nd field) of about 10-40px look good inline next to text.
- If you want to have the image "float" to any convenient place on the page, leave [√] Wrap text around this item enabled. See the "Floating image" example to the right →
- Click Insert to insert the image. You can always Double-Click the image or Choose the Edit button to change these settings again.
Linking to a PDF or other file
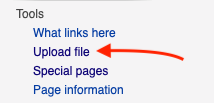
First you upload the PDF (or other acceptable file type), and copy the link to the newly uploaded PDF, and then paste that link into your Wiki page. It is useful to do this with two separate windows open, one for editing the wiki page you want to add a link on, and another for uploading the file.
- Make sure you are logged in. If you get logged out during this process, don't close any windows, instead follow this.
- Optionally, open a new web-browser window for performing the file upload.
- In the left sidebar, near the bottom, click Upload FIle
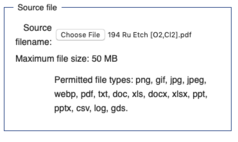
- Click [Choose File] and select the file from your computer you want to upload.
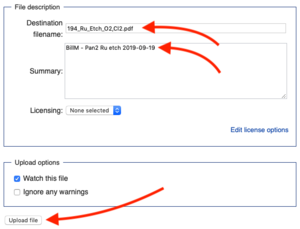
- Enter the filename you'd like the file to have once it is on the server. Something simple like "ToolName - SOP.pdf" etc. Make sure you keep the same file extension. Also Enter a Description of the file, can be as simple as the above. This makes it searchable on the wiki.
- Click the [Upload] button, and wait for the upload to complete (after which a new page will show).
- If it shows a warning, choose [Submit modified filename/description]
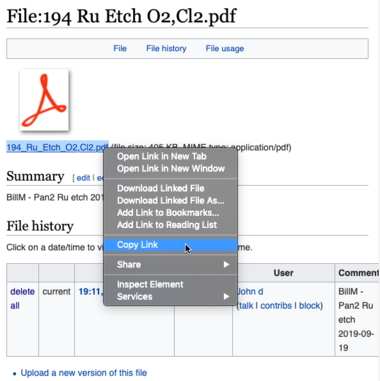
- On the resulting File Info page, right-click the file link and Copy Link/URL.
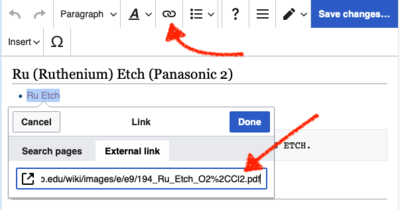
- Back on the wiki page you're editing, select the text you want to link, and paste in the URL as an External Link.
Linking to a file you already uploaded
If you already uploaded the file and now need to link to it, you can find the uploaded file and copy the link as follows:
- On the left sidebar, at the bottom section "Tools", click "Upload File".
- On that page, click the link for "List of Uploaded Files" in the 2nd sentence.
- Locate your file in the list.
- Click the Title of the file, which brings you to the File's File Info page - same as the above procedure (Step 7).
- From here, follow Step 7 above onwards - you can now copy the directly link to the file itself, and insert into your desired Wiki page, as described above.
Updating an uploaded file to a new version
You can replace an uploaded file with a new version. This means any links will now point to the new version.
- Find the "File:" page for the existing file on the wiki. Do this by:
- Searching the Wiki for the file name of the original file, or part of the file name. Hit [Enter] in the search bar to show all search results.
- In the search results, click on the Wiki-Page of your File - it will begin with "File:", such as "File: My Photo.jpg"
- Under "File History", click "upload new version".
- Upload your new version of the file. It will automatically have exact same destination file name on the server, so all links to the file will still work.
- (It can take ~1 day for user's web browsers to stop using cached old versions of the file.)
Administration
Approving Edits (Staff/Admin only)
While lab users are allowed to modify the wiki, their edits will not become visible to anyone until a staff member approves those edits. (When any member of the staff edits a page, those edits are automatically approved.)
NOTE TO STAFF: Take care to watch for approvals before editing because if a page has edits waiting to be approved and you edit the page normally, those edits will automatically be approved!! Before you edit a page, always make sure that there are no new revisions waiting to be approved (this is described below).
When you arrive at a page, you will see one of two messages. Either "No new revisions" or "THERE ARE NEW REVISIONS TO THIS PAGE.".
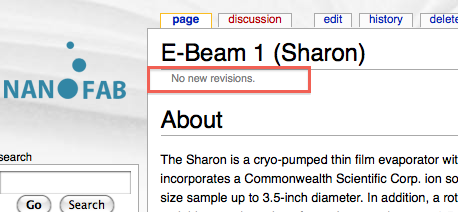 |
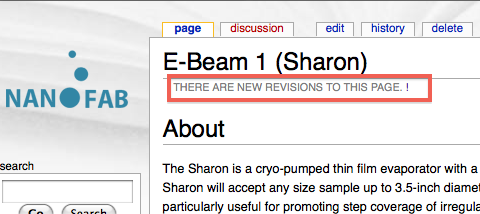 |
If there are new revisions, click on the history tab.
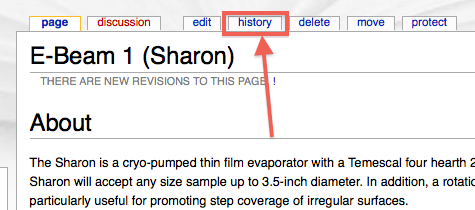
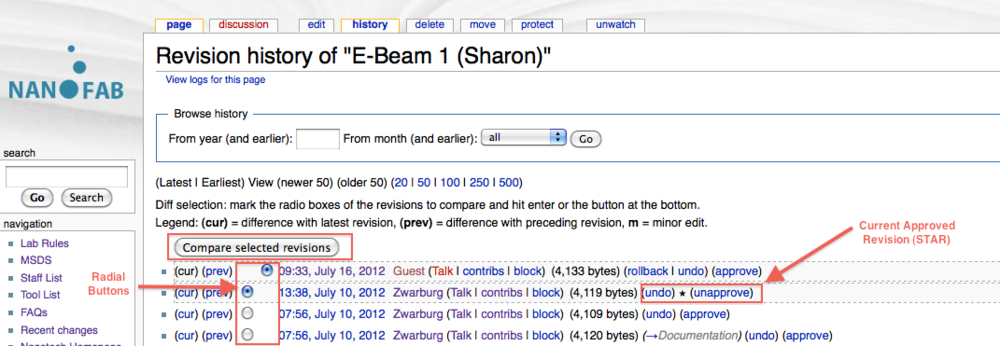
This will take you to the full edit history of the page. You will see an entry that has a star on it, this is the current approved revision. Anything after that (above it) has not yet been approved. Put the LEFT radial button on the currently approved revision and set the right radial button anywhere above it to compare other additions. Click "Compare selected revisions".
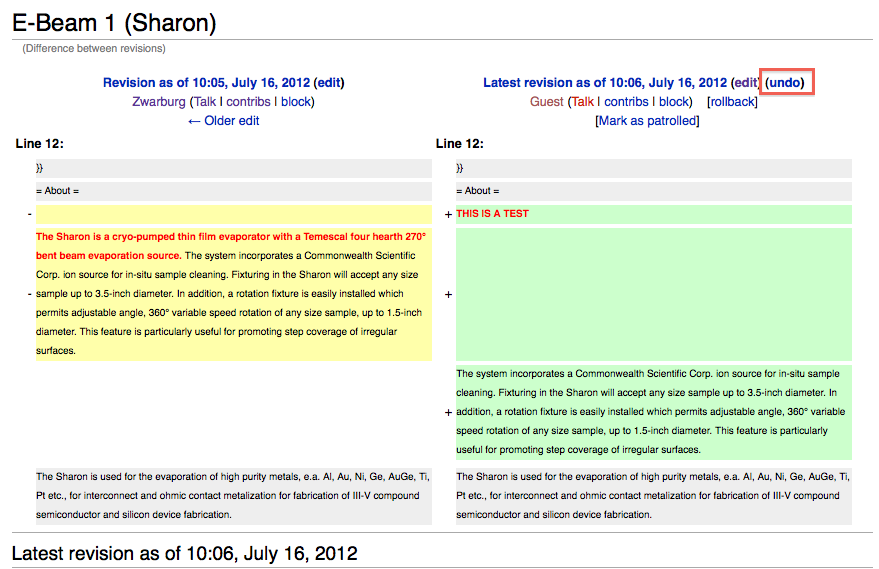
The window will show you the before (on the left) and the after (on the right). You can also scroll down to see how the NEW page actually looks (AFTER the edit you are view has taken effect). In this case, the user "Guest" has deleted the sentence "The Sharon is a cryo-pumped thin film evaporator with a Temescal four hearth 270° bent beam evaporation source." and has inserted the sentence "THIS IS A TEST". If you like the edit and want to keep it, go back (by pressing the back button in your web-browser) and then click approve next to the edit in question. If you do NOT like the edit, click "undo", then scroll to the bottom of the page that opens and click save. If you like part of the edit but want to modify it, approve it, then edit the page as you normally would.
My Watchlist
Your watchlist is the set of pages that you are "watching" for changes. You can view you watchlist at any time by clicking the link in the top right of the screen.

I strongly recommend that you each add your tools to your watch list. This will allow you to see whenever these pages are modified by a user. To add a page to your watch list, go to the page you want to add and click on "watch" at the top of the page. (To remove a page from you watchlist, do the same thing, the button will read "unwatch" instead.)

You can also set it up so that you will recieve an e-mail any time one of the pages on your watchlist is changed (by someone other then yourself). I would also HIGHLY recommend doing this. These emails will come from NanofabWiki@ece.ucsb.edu so you can setup a filter and put all these e-mails in one folder. You will only receive one e-mail per page between visits. In other words if 10 people make changes back to back. You will only get ONE e-mail notifying you that a change has been made, not 10 e-mails. As soon as you view the page form your account, that resets so any changes made after you view it will result in another, single e-mail.
To set this up go to your preferences by click on the "my preferences".

In your preferences you will find a lot of options. The 2 that you need to take care of are your e-mail address (enter it into the box labeled "E-mail") and you need to check the box next to "E-mail me when a page on my watch-list is changed." Save the changed by clicking "Save" at the bottom of the page.
Editing Restrictions
To prevent unauthorized editing on the site, we have setup 4 different user groups. These restrictions only pertain to EDITING.
1) Annonymous/Unregistered users
- Anyone not registered or not logged in will not be able to edit anything on the site.
2) Lab Users
- This is anyone who we know to be doing research in the lab (names taken from SignupMonkey). They are allowed to edit existing pages but are not allowed to upload files or create new pages. All edits by Lab Users have to be approved by staff members before they are viewable on the site.
3) Staff
- This group consist of all staff members. Staff will be able to edit 95% of the pages on the wiki. There are a select few pages on the site that are locked. For example, on the Main Page, Staff do not have the option to "EDIT" the page, only the option to "VIEW SOURCE"
4) Administrators
- This group is for the people in charge of maintaining the nitty-gritty of the site. They have unrestricted access and can change anything on the site. They can also change the "user group level" for any user.
Troubleshooting / FAQ
It won't let me "Save" my changes!
Sometimes the web server logs you out due to "inactivity" when you are actually just spending a long time editing a page. Thus, when you try to "save page", you get an error like "you are not authorized to edit this page" since it thinks you're not logged in.
This is the typical error:
We could not save your edit because the session was no longer valid. Do you want to save this page as an anonymous user instead? Your IP address will be recorded in this page's edit history.
If this happens, do Not close the window with your unsaved edits!
A quick workaround is to open a New web-browser window, navigate to the wiki and log in there. After a few seconds, try saving the edited page again, and it should work this time. You may have to hit "Try Again" for it to work.
If this does not work, you want to be sure you don't lose all your hard work! One way to do this is to copy the Wiki Code into a text file on your computer, as follows: If you are using the VisualEditor (default), switch to Source Code view via the Pen button ![]() > [Source Editing], then Select All and Copy the code for the page. Then paste it into a NotePad.exe or TextEdit.app window on your computer (optionally save the file to your computer somewhere).
> [Source Editing], then Select All and Copy the code for the page. Then paste it into a NotePad.exe or TextEdit.app window on your computer (optionally save the file to your computer somewhere).
Then, once you have managed to log back into the Wiki, you can edit the 'Source' of the page and paste your source code in the appropriate place. Be sure to "Preview" the results to make sure it worked as expected, and that you pasted into the right spot!
I can't upload my file - it says the file is too large
For uploaded files, there is a maximum file size limit and a limited list of allowed file types, to prevent hacking and viruses. If you run into one of these limitations please contact the Wiki Admin and they can help you get the file uploaded and properly linked.

