GoPro Hero8 Black (Internal): Difference between revisions
all sections added, TBA's inserted |
minor formatting |
||
| Line 14: | Line 14: | ||
** Batteries charge while inserted into the GoPro camera, and then plug the USB cable in. |
** Batteries charge while inserted into the GoPro camera, and then plug the USB cable in. |
||
** Note that the GoPro USB cable is a high-quality (high data rate) USB-C/USB-A cable - cheaper versions usually ''don't work,'' so don't lose this cable! |
** Note that the GoPro USB cable is a high-quality (high data rate) USB-C/USB-A cable - cheaper versions usually ''don't work,'' so don't lose this cable! |
||
* Download smartphone app called "GoPro" by the company "GoPro, Inc." to your own phone. |
* Download smartphone app called "GoPro" by the company "GoPro, Inc." to your own phone. |
||
* [[File:GoPro H8b training - Smartphone App.jpg|none|thumb|200x200px]] |
* [[File:GoPro H8b training - Smartphone App.jpg|none|thumb|200x200px]] |
||
* Turn on the GoPro camera (hold down power button on the side) |
* Turn on the GoPro camera (hold down power button on the side) |
||
| Line 26: | Line 24: | ||
**#* Select "Connections" and then tap on "Connect Device." |
**#* Select "Connections" and then tap on "Connect Device." |
||
**#* Tap on "GoPro App" to put your camera in pairing mode.<span name="HERO6Black"></span> |
**#* Tap on "GoPro App" to put your camera in pairing mode.<span name="HERO6Black"></span> |
||
**#* At this point, you can tap on the "i" icon in the top right corner to see your WiFi name and password. |
**#* ''Optional'': At this point, you can tap on the "i" icon in the top right corner to see your WiFi name and password. |
||
**# Open the GoPro App on your SmartPhone: |
**# Open the GoPro App on your SmartPhone: |
||
**#* Select the Camera logo at the bottom left corner of the app and it will automatically begin scanning for your camera |
**#* Select the Camera logo at the bottom left corner of the app and it will automatically begin scanning for your camera |
||
**#* You should see "We Found Your GoPro" and a blue "'''Connect'''" button. Tap on '''Connect'''. |
**#* You should see "We Found Your GoPro" and a blue "'''Connect'''" button. Tap on '''Connect'''. |
||
**#** You will see a section to change your camera's name, or you can tap on the bottom button to leave the name as it is. |
**#** ''Optional'': You will see a section to change your camera's name, or you can tap on the bottom button to leave the name as it is. |
||
**#* Once a name is set your GoPro App will show a live preview of your camera. You're all set! |
**#* Once a name is set your GoPro App will show a live preview of your camera. You're all set! |
||
* Wear headphones for your smartphone (wireless is great, but wired is also ok). |
* Wear headphones for your smartphone (wireless is great, but wired is also ok). |
||
** This helps with checking to see if a video sounds/looks ok. |
** This helps with checking to see if a video sounds/looks ok. |
||
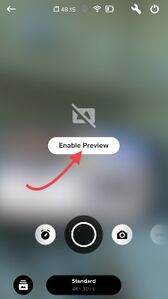
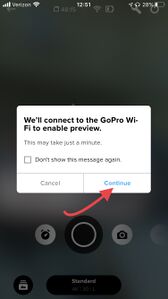
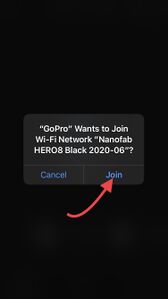
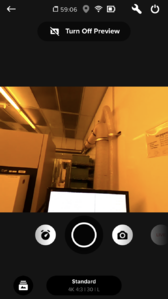
* Put the GoPro on your head mount, and launch the GoPro phone app and "'''''enable live preview'''''". |
* Put the GoPro on your head mount, and launch the GoPro phone app and "'''''enable live preview'''''". |
||
** ''Detailed Instructions for |
** ''Detailed Instructions for Live Preview are below.'' |
||
* Adjust the angle of the camera so the preview shows what you’re looking at. You want to be "naturally" looking at something, and make sure the GoPro shows the same thing. |
* Adjust the angle of the camera so the preview shows what you’re looking at. You want to be "naturally" looking at something, and make sure the GoPro shows the same thing. |
||
** Usually the headmount will aim ''high'' - looking above what your eyes are looking at, so adjust it down. |
** Usually the headmount will aim ''high'' - looking above what your eyes are looking at, so adjust it down. |
||
=== In the Lab: Recording your video === |
=== In the Lab: Recording your video === |
||
* ''(optional) Bring wired or bluetooth headphones that you can use with your smartphone - this is only for listening to video while in the lab. The "live" audio will be from the GoPro's built-in Mic - it works fine.'' |
|||
* Turn on camera - hold down the power button on the side. |
* Turn on camera - hold down the power button on the side. |
||
* Place camera on mount - either head mount (use your own assigned head mount), or Clip mount etc. |
* Place camera on mount - either head mount (use your own assigned head mount), or Clip mount etc. |
||
* On GoPro smartphone app: |
* On GoPro smartphone app: |
||
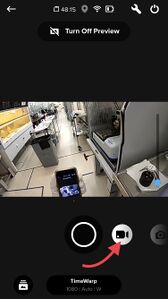
** Enable Live Preview to view the video from the SmartPhone App. |
** Enable Live Preview to view the video from the SmartPhone App. |
||
{| class="wikitable" |
::{| class="wikitable" |
||
|+ |
|||
|[[File:GoPro Hero8 Black - Enable preview 1 - IMG 2766.jpg|300x300px]] |
|[[File:GoPro Hero8 Black - Enable preview 1 - IMG 2766.jpg|300x300px]] |
||
|[[File:Gopro Hero8 Black - Enable preview 2 - use wifi IMG 2769.jpg|300x300px]] |
|[[File:Gopro Hero8 Black - Enable preview 2 - use wifi IMG 2769.jpg|300x300px]] |
||
| Line 53: | Line 51: | ||
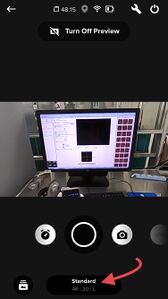
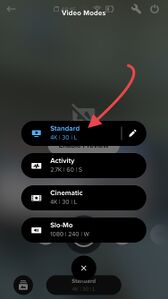
* Choose Video Mode and "Standard" preset |
* Choose Video Mode and "Standard" preset |
||
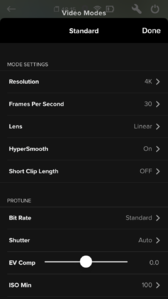
** The "standard" preset is set for training purposes (reduced field of view, high resolution, reduced motion correction) |
** The "standard" preset is set for training purposes (reduced field of view, high resolution, reduced motion correction) |
||
{| class="wikitable" |
::{| class="wikitable" |
||
|+ |
|||
|Choose Video mode - 2nd from left.[[File:GoPro Hero8 Black - Choose video - IMG 2771.jpg|300x300px]] |
|Choose Video mode - 2nd from left.[[File:GoPro Hero8 Black - Choose video - IMG 2771.jpg|300x300px]] |
||
|Use "Standard" settings.[[File:GoPro Hero8 Black - Presets 1 - IMG 2765.jpg|300x300px]] |
|Use "Standard" settings.[[File:GoPro Hero8 Black - Presets 1 - IMG 2765.jpg|300x300px]] |
||
| Line 66: | Line 63: | ||
** Adjust the camera's angle on the your mount, so that what you look at is centered on the screen, then tighten. (Same as done outside the lab.) |
** Adjust the camera's angle on the your mount, so that what you look at is centered on the screen, then tighten. (Same as done outside the lab.) |
||
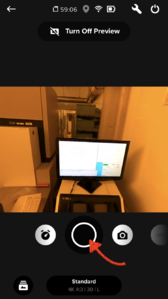
* Start/stop the video recording with the Circle button on the SmartPhone app. |
* Start/stop the video recording with the Circle button on the SmartPhone app. |
||
: [[File:GoPro Hero8 Black - Video record button - IMG 2764.png|none|thumb|300x300px|Press the Circle button to start/stop recording.]] |
|||
| ⚫ | |||
| ⚫ | |||
* You can always look at saved videos through the smartphone app, to check your recording. |
* You can always look at saved videos through the smartphone app, to check your recording. |
||
** This is where headphones in the lab are very helpful, so you can hear the audio of your recordings. |
** This is where '''headphones''' in the lab are very helpful, so you can hear the audio of your recordings. |
||
= Editing Video = |
|||
Edits are best performed on the GoPro smartphone app, outside the lab. |
Edits are best performed on the GoPro smartphone app, outside the lab. |
||
''(Untested. I recommend avoiding video editing as much as possible - please add instructions you think will be useful here. --Demis 2020-07-04)'' |
''(Untested. I recommend avoiding video editing as much as possible - please add instructions you think will be useful here. --Demis 2020-07-04)'' |
||
= Saving the Video to your computer = |
|||
There are two ways to save the video. I prefer to plug the GoPro into a laptop/desktop computer (good for posting to Wiki and online trainings via web-meeting). You can also save it to your smartphone, but this appears to be more complex for our purposes (good for social media). |
There are two ways to save the video. I prefer to plug the GoPro into a laptop/desktop computer (good for posting to Wiki and online trainings via web-meeting). You can also save it to your smartphone wirelessly, but this appears to be more complex for our purposes (good for social media). |
||
# Outside the lab, at your desktop/laptop computer: |
# Outside the lab, at your desktop/laptop computer: |
||
# Plug the GoPro camera into your computer using the supplied USB-A to USB-C cable. |
# Plug the GoPro camera into your computer using the supplied USB-A to USB-C cable. |
||
| Line 93: | Line 89: | ||
## '''''To Be Added''''' |
## '''''To Be Added''''' |
||
= Uploading to the Wiki = |
|||
On your Tool's Wiki page, add a Heading section for training videos, and add links to those videos, similar to uploading PDF files (see the [[Editing Tutorials#Linking to a PDF or other file|Editing Tutorials section on this]]). |
On your Tool's Wiki page, add a Heading section for training videos, and add links to those videos, similar to uploading PDF files (see the [[Editing Tutorials#Linking to a PDF or other file|Editing Tutorials section on this]]). |
||
'''Note''' - we may have issues with upload limits on file sizes of file types. We may need to host a separate site just for uploading these videos. Demis will check with Johann on this, the Wiki method is probabaly too annoying for hosting these. |
'''Note''' - we may have issues with upload limits on file sizes of file types. We may need to host a separate site just for uploading these videos. Demis will check with Johann on this, the Wiki method is probabaly too annoying for hosting these. |
||
= Trainings via Webmeeting (Zoom) = |
|||
* Schedule a Zoom meeting at [https://ucsb.zoom.us ucsb.zoom.com] - use your UCSB NetID credentials. |
* Schedule a Zoom meeting at [https://ucsb.zoom.us ucsb.zoom.com] - use your UCSB NetID credentials. |
||
* <<Insert steps here, initial guess below>> |
** <<Insert steps here, initial guess below>> |
||
* Reccommend that users use a desktop/laptop computer to join, not just phone. They will need to see details on the screen. |
* Reccommend that users use a desktop/laptop computer to join, not just phone. They will need to see details on the screen. |
||
* Require all attendees to have video ON |
* Require all attendees to have video ON |
||
Revision as of 21:33, 4 July 2020
Use this camera with various mounts, to record training videos for your tools.
You can edit the videos after the fact, but it's not required - a "good enough" video even with mistakes or corrections would be fine.
We recommend doing online Zoom trainings, during which you screenshare and pull up the recorded video(s), which allows you to play/pause/zoom in on certain parts of the video as needed, and pause to answer user questions.
These is an initial draft of instructions - please feel free to edit! -- Demis 2020-07-02
Procedure for recording
Outside the lab, before your training
- Fully charge your smartphone
- GoPro has a spare battery - make sure both are charged.
- Batteries charge while inserted into the GoPro camera, and then plug the USB cable in.
- Note that the GoPro USB cable is a high-quality (high data rate) USB-C/USB-A cable - cheaper versions usually don't work, so don't lose this cable!
- Download smartphone app called "GoPro" by the company "GoPro, Inc." to your own phone.
- Turn on the GoPro camera (hold down power button on the side)
- Connect your GoPro smartphone app to the camera (requires Bluetooth and WiFi enabled).
- Instructions for this can be found on the GoPro website here, also copy/pasted below.
- Pick up your camera:
- Power on your camera.
- Open the utility drawer by swiping from the top to the bottom of the touch display, then select "Preferences."
- Select "Connections" and then tap on "Connect Device."
- Tap on "GoPro App" to put your camera in pairing mode.
- Optional: At this point, you can tap on the "i" icon in the top right corner to see your WiFi name and password.
- Open the GoPro App on your SmartPhone:
- Select the Camera logo at the bottom left corner of the app and it will automatically begin scanning for your camera
- You should see "We Found Your GoPro" and a blue "Connect" button. Tap on Connect.
- Optional: You will see a section to change your camera's name, or you can tap on the bottom button to leave the name as it is.
- Once a name is set your GoPro App will show a live preview of your camera. You're all set!
- Pick up your camera:
- Instructions for this can be found on the GoPro website here, also copy/pasted below.
- Wear headphones for your smartphone (wireless is great, but wired is also ok).
- This helps with checking to see if a video sounds/looks ok.
- Put the GoPro on your head mount, and launch the GoPro phone app and "enable live preview".
- Detailed Instructions for Live Preview are below.
- Adjust the angle of the camera so the preview shows what you’re looking at. You want to be "naturally" looking at something, and make sure the GoPro shows the same thing.
- Usually the headmount will aim high - looking above what your eyes are looking at, so adjust it down.
In the Lab: Recording your video
- (optional) Bring wired or bluetooth headphones that you can use with your smartphone - this is only for listening to video while in the lab. The "live" audio will be from the GoPro's built-in Mic - it works fine.
- Turn on camera - hold down the power button on the side.
- Place camera on mount - either head mount (use your own assigned head mount), or Clip mount etc.
- On GoPro smartphone app:
- Enable Live Preview to view the video from the SmartPhone App.
- Choose Video Mode and "Standard" preset
- The "standard" preset is set for training purposes (reduced field of view, high resolution, reduced motion correction)
- Adjust camera angle using Live Preview on smartphone:
- Look naturally at some object, and make sure the SmartPhone's preview is showing the same object centered in the screen.
- Typically the camera is angled too high.
- Adjust the camera's angle on the your mount, so that what you look at is centered on the screen, then tighten. (Same as done outside the lab.)
- Start/stop the video recording with the Circle button on the SmartPhone app.
Press the Circle button to start/stop recording. - You can always stop the recording and restart, with the intention of piecing the recording together at the end. However, it is much less effort to only do a single take and fix mistakes during the recording, as you can spend a lot of time on video editing.
- You can always look at saved videos through the smartphone app, to check your recording.
- This is where headphones in the lab are very helpful, so you can hear the audio of your recordings.
Editing Video
Edits are best performed on the GoPro smartphone app, outside the lab.
(Untested. I recommend avoiding video editing as much as possible - please add instructions you think will be useful here. --Demis 2020-07-04)
Saving the Video to your computer
There are two ways to save the video. I prefer to plug the GoPro into a laptop/desktop computer (good for posting to Wiki and online trainings via web-meeting). You can also save it to your smartphone wirelessly, but this appears to be more complex for our purposes (good for social media).
- Outside the lab, at your desktop/laptop computer:
- Plug the GoPro camera into your computer using the supplied USB-A to USB-C cable.
- This is a high-data rate cable - cheaper versions are known to not work properly, so don't lose this!
- Turn on the GoPro Camera by holding down the power button on the Side.
- On a Mac: (approximate instructions, not exact)
- Use your computer's Search/Spotlight function (⌘-Space) to launch Applications / Image Capture.app
- Select the GoPro camera in the sidebar - you will see all the recorded videos and photos.
- Choose a folder to Download into on the bottom of the screen
- Select the media to download (use Shift or ⌘ to select multiple items)
- Click "Download Selected" or "Download All" and wait for it to complete, it can take some time.
- The files will be downloaded to the specified folder.
- On Windows:
- To Be Added
Uploading to the Wiki
On your Tool's Wiki page, add a Heading section for training videos, and add links to those videos, similar to uploading PDF files (see the Editing Tutorials section on this).
Note - we may have issues with upload limits on file sizes of file types. We may need to host a separate site just for uploading these videos. Demis will check with Johann on this, the Wiki method is probabaly too annoying for hosting these.
Trainings via Webmeeting (Zoom)
- Schedule a Zoom meeting at ucsb.zoom.com - use your UCSB NetID credentials.
- <<Insert steps here, initial guess below>>
- Reccommend that users use a desktop/laptop computer to join, not just phone. They will need to see details on the screen.
- Require all attendees to have video ON
- it verifies that all participants are present and paying attention - local teachers found this was necessary!
- Share your Screen .
- Load The pre-recorded video, and play/pause as needed.
- Use a player that allows you to zoom in on details, such as text on the tool's computer screen/software etc.
- On Mac: Demis found that the default Quicktime Player does NOT let you zoom in closer than full-screen!
- On Windows: To be added
- Use a player that allows you to zoom in on details, such as text on the tool's computer screen/software etc.
