Step Profilometer (DektakXT): Difference between revisions
Created page with "{{tool|{{PAGENAME}} |picture=Dektak6M.jpg |type = Inspection, Test and Characterization |super= Mike Silva |phone=(805)839-3918x219 |location=Bay 3 |email=silva@ece.ucsb.edu |des…" |
changed image, linked to mfg. |
||
| (12 intermediate revisions by 3 users not shown) | |||
| Line 1: | Line 1: | ||
{{ |
{{tool2|{{PAGENAME}} |
||
|picture= |
|picture=DektakXT.jpg |
||
|type = Inspection, Test and Characterization |
|type = Inspection, Test and Characterization |
||
|super= |
|super= Aidan Hopkins |
||
|super2= Bill Millerski |
|||
|phone=(805)839-3918x219 |
|phone=(805)839-3918x219 |
||
|location=Bay 3 |
|location=Bay 3 |
||
|email=silva@ece.ucsb.edu |
|email=silva@ece.ucsb.edu |
||
|description = Surface Profilometer |
|description = Surface Profilometer |
||
|manufacturer = [https://www.bruker.com/en/products-and-solutions/test-and-measurement/stylus-profilometers/dektakxt.html Bruker] |
|||
|manufacturer = Veeco Metrology LLC |
|||
|materials = |
|materials = |
||
}} |
}} |
||
= |
=About= |
||
The |
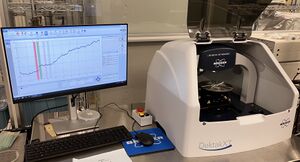
The DektakXT is a profilometer for measuring step heights or trench depths on a surface. This is a surface contact measurement technique where a very low force stylus is dragged across a surface. The DektakXT offers Windows based data acquisition, data analysis, and equipment control. The force of the tip on the surface is adjustable from .03 mg to 15 mg, allowing for the measuring of hard and soft surfaces. A stress measurement option is also included with this tool. The profilometer can measure to a depth of over 1 mm, allowing for direct measurement of MEMS type structures. Lateral resolution is tip-shape dependent and vertical resolution is 1A (when using the 6.55 um range). The lateral resolution is limited by the tip shape. A video camera with variable magnification allows for manual placement of the stylus using the manual X, Y, Theta stage. Software analysis can determine roughness, average step height, etc. |
||
=Detailed Specifications= |
=Detailed Specifications= |
||
* |
*50 mm maximum sample thickness/8 inch maximum sample diameter |
||
*.03 mg to 15 mg variable tip force |
*.03 mg to 15 mg variable tip force |
||
*Height/Depth measurements to 1 mm |
*Height/Depth measurements to 1 mm |
||
* |
*4 A repeatability on 0.1 um step and vertical resolution of 0.1 um |
||
*Standard stylus radius is 12.5 um, optional 2 um stylus available |
*Standard stylus radius is 12.5 um, optional 2 um stylus available |
||
*6 inch stage diameter with manual controls for moving and leveling |
*6 inch stage diameter with manual controls for moving and leveling |
||
*Maximum scan length of 55mm (minimum of 50um) |
|||
*Software data leveling and other analysis including stress |
*Software data leveling and other analysis including stress and roughness |
||
*Full GUI-based Windows control and data storage and exporting capability |
*Full GUI-based Windows control and data storage and exporting capability |
||
=Tool References= |
|||
*[https://wiki.nanotech.ucsb.edu/w/images/6/6c/DektakXT_Operating_Procedure.pdf DektakXT SOP] |
|||
*[https://www.youtube.com/watch?v=HINRiQ7XUwE DektakXT Pre-Training Video] |
|||
Latest revision as of 04:51, 11 May 2023
| ||||||||||||||||||||||||||
About
The DektakXT is a profilometer for measuring step heights or trench depths on a surface. This is a surface contact measurement technique where a very low force stylus is dragged across a surface. The DektakXT offers Windows based data acquisition, data analysis, and equipment control. The force of the tip on the surface is adjustable from .03 mg to 15 mg, allowing for the measuring of hard and soft surfaces. A stress measurement option is also included with this tool. The profilometer can measure to a depth of over 1 mm, allowing for direct measurement of MEMS type structures. Lateral resolution is tip-shape dependent and vertical resolution is 1A (when using the 6.55 um range). The lateral resolution is limited by the tip shape. A video camera with variable magnification allows for manual placement of the stylus using the manual X, Y, Theta stage. Software analysis can determine roughness, average step height, etc.
Detailed Specifications
- 50 mm maximum sample thickness/8 inch maximum sample diameter
- .03 mg to 15 mg variable tip force
- Height/Depth measurements to 1 mm
- 4 A repeatability on 0.1 um step and vertical resolution of 0.1 um
- Standard stylus radius is 12.5 um, optional 2 um stylus available
- 6 inch stage diameter with manual controls for moving and leveling
- Maximum scan length of 55mm (minimum of 50um)
- Software data leveling and other analysis including stress and roughness
- Full GUI-based Windows control and data storage and exporting capability
